Introduction Link to heading
Authentication has always been one of the most critical parts of API development, preventing unauthorized access to sensitive resources. There are various methods for implementing authentication, but using JSON Web Tokens (JWT) is highly popular due to its lightweight nature, flexibility, and especially its stateless architecture.
One crucial aspect of using JWT is where the tokens are stored. If tokens are stored in insecure places like localStorage, the risk of theft or misuse significantly increases.
In this article, we’ll discuss how to implement an authentication system using JWT and HttpOnly cookies to enhance the security of our APIs.
What is JWT? Link to heading
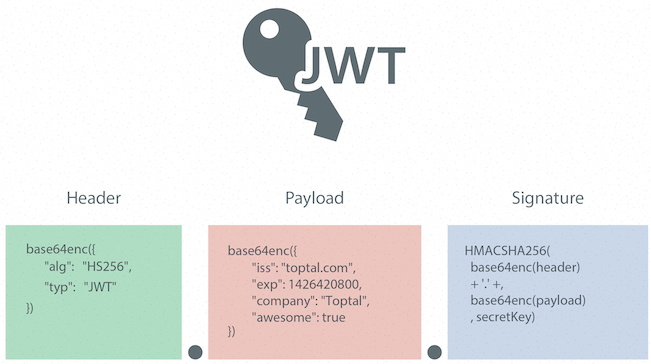
JWT or JSON Web Token, is a standard for securely transferring information between different systems. This information is exchanged as an encrypted token, which can contain various details like user ID, expiration time, and more. JWT tokens consist of three main parts:
- Header: Contains information about the token type and encryption algorithm.
- Payload: Holds the main data, such as user ID or role.
- Signature: Created using a private key to ensure the content hasn’t been changed along the way.
The main advantage of using JWT is that it’s stateless, meaning the server doesn’t need to store token information in a database for authentication. This makes the system more scalable and prevents unnecessary database queries.
The JWT system uses two types of tokens:
- Access Token: Used for authentication in APIs and has a short lifespan, reducing the risk if it gets stolen.
- Refresh Token: Has a longer lifespan and allows users to obtain a new Access Token without re-login.
For more details, you can visit the jwt.io website.
Where Should We Store JWT Tokens? Link to heading
When using JWT for authentication, we need to store the user’s tokens so they can be sent with every request to the server. The question is:
Many people store tokens in localStorage for convenience. However, this method has its problems. One of the biggest risks is XSS attacks. In such an attack, if an attacker can run malicious code in the victim’s browser, they can easily access localStorage and steal the security tokens!
Therefore, the best approach is to use HttpOnly Cookies. These cookies are set by the server, and the browser automatically sends the tokens with subsequent requests. Most importantly, since these cookies are not accessible to JavaScript, the risk of token theft through XSS is eliminated.
However, simply storing JWT tokens in cookies is not enough and could leave the system vulnerable to CSRF attacks. In the next section of the article, we will discuss how to prevent CSRF attacks.
Project Implementation Link to heading
In this section, we’ll create a Django project from scratch and implement the authentication system using the DRF and SimpleJWT libraries.
1. Create a New Django Project Link to heading
First, we’ll create a new project and install the required libraries. You can use the following commands:
mkdir drf-jwt-httponly-cookie
cd drf-jwt-httponly-cookie
uv init
uv add django djangorestframework djangorestframework-simplejwt
source .venv/bin/activate  # Activate virtual environment
django-admin startproject backend
uv for package management. uv is a replacement for tools like pip and poetry, written in Rust, offering better features and speed. I highly recommend giving it a try. (uv documentation)At this point, the structure of our project looks like this:
├── backend
│   ├── backend
│   │   ├── asgi.py
│   │   ├── __init__.py
│   │   ├── settings.py
│   │   ├── urls.py
│   │   └── wsgi.py
│   └── manage.py
├── pyproject.toml
└── uv.lock
To use the libraries, we’ll modify the settings.py file as follows:
# backend/settings.py
from datetime import timedelta

INSTALLED_APPS = [
    "django.contrib.admin",
    "django.contrib.auth",
    "django.contrib.contenttypes",
    "django.contrib.sessions",
    "django.contrib.messages",
    "django.contrib.staticfiles",
    # Third-party apps
    "rest_framework",
    "rest_framework_simplejwt",
]

# Simple JWT
SIMPLE_JWT = {
    "ACCESS_TOKEN_LIFETIME": timedelta(minutes=15),
    "REFRESH_TOKEN_LIFETIME": timedelta(days=30),
    # Auth
    "AUTH_HEADER_TYPES": ("Bearer",),
}
2. Implementing the Login API Link to heading
To implement the login system, we’ll first create a new app:
python manage.py startapp accounts
INSTALLED_APPS in settings.py.Before writing the API, we need to add some new settings for the cookies related to Access Token and Refresh Token.
# backend/settings.py
from datetime import timedelta

# Simple JWT
SIMPLE_JWT = {
    "ACCESS_TOKEN_LIFETIME": timedelta(minutes=15),
    "REFRESH_TOKEN_LIFETIME": timedelta(days=30),
    # Auth
    "AUTH_HEADER_TYPES": ("Bearer",),
    # Auth Cookie
    "AUTH_COOKIE_ACCESS": "access_token",
    "AUTH_COOKIE_REFRESH": "refresh_token",
    "AUTH_COOKIE_DOMAIN": None,  # ".example.com" or None for standard domain cookie
    "AUTH_COOKIE_SECURE": False,  # Whether the auth cookies should be secure (https:// only).
    "AUTH_COOKIE_HTTP_ONLY": True,
    "AUTH_COOKIE_SAMESITE": "Lax",  # The flag restricting cookie leaks on cross-site requests. 'Lax', 'Strict' or None to disable the flag.
    "AUTH_COOKIE_REFRESH_PATH": "/accounts/auth/",
}
For enhanced security of the cookies, we should configure the following parameters:
- Secure: If this is set to
True, the cookie will only be sent overHTTPS. Make sure to enable this in theproductionenvironment. - Domain: This parameter specifies the domain where the cookie is valid. If the API and client are on different domains, you can set this as
Domain=.example.com. - Path: By default, this is set to
/, meaning the cookie will be sent with all requests. Since the Refresh Token is only needed for specific routes, we’ll configure this parameter for the Refresh Token cookie to only be sent with the necessary requests.
To add authentication tokens in cookies, we’ll add the following function to the project, which we’ll later use for logging in the user:
# accounts/jwt.py
from django.conf import settings
from rest_framework.response import Response


def set_token_cookies(
    response: Response,
    access_token: str | None = None,
    refresh_token: str | None = None,
) -> None:
    if access_token:
        response.set_cookie(
            key=settings.SIMPLE_JWT["AUTH_COOKIE_ACCESS"],
            value=access_token,
            max_age=settings.SIMPLE_JWT["ACCESS_TOKEN_LIFETIME"],
            secure=settings.SIMPLE_JWT["AUTH_COOKIE_SECURE"],
            domain=settings.SIMPLE_JWT["AUTH_COOKIE_DOMAIN"],
            httponly=settings.SIMPLE_JWT["AUTH_COOKIE_HTTP_ONLY"],
            samesite=settings.SIMPLE_JWT["AUTH_COOKIE_SAMESITE"],
        )

    if refresh_token:
        response.set_cookie(
            key=settings.SIMPLE_JWT["AUTH_COOKIE_REFRESH"],
            value=refresh_token,
            max_age=settings.SIMPLE_JWT["REFRESH_TOKEN_LIFETIME"],
            path=settings.SIMPLE_JWT["AUTH_COOKIE_REFRESH_PATH"],
            secure=settings.SIMPLE_JWT["AUTH_COOKIE_SECURE"],
            domain=settings.SIMPLE_JWT["AUTH_COOKIE_DOMAIN"],
            httponly=settings.SIMPLE_JWT["AUTH_COOKIE_HTTP_ONLY"],
            samesite=settings.SIMPLE_JWT["AUTH_COOKIE_SAMESITE"],
        )
Next, we need to create the login API, which will accept the username and password, and if the information is correct, it will store and send the authentication tokens in the cookies.
# accounts/serializers.py
from rest_framework import serializers
from rest_framework_simplejwt.serializers import PasswordField


class LoginSerializer(serializers.Serializer):
    username = serializers.CharField()
    password = PasswordField()
# accounts/views.py
from django.contrib.auth import authenticate
from rest_framework import status
from rest_framework.exceptions import AuthenticationFailed
from rest_framework.response import Response
from rest_framework.views import APIView
from rest_framework_simplejwt.tokens import RefreshToken

from accounts.jwt import set_token_cookies
from accounts.serializers import LoginSerializer


class LoginAPIView(APIView):
    serializer_class = LoginSerializer
    authentication_classes = ()
    permission_classes = ()

    def post(self, request):
        serializer = self.serializer_class(data=request.data)
        serializer.is_valid(raise_exception=True)

        username = serializer.validated_data["username"]
        password = serializer.validated_data["password"]
        user = authenticate(request, username=username, password=password)

        if not user:
            raise AuthenticationFailed

        response = Response({}, status=status.HTTP_200_OK)

        # Set auth cookies
        refresh = RefreshToken.for_user(user)
        set_token_cookies(response, str(refresh.access_token), str(refresh))

        return response
# accounts/urls.py
from django.urls import path

from accounts import views

app_name = "accounts"
urlpatterns = [
    path("auth/login/", views.LoginAPIView.as_view(), name="login"),
]
To add a new URL to the project, make sure to update the main urls.py file as follows:
# backend/urls.py
from django.conf import settings
from django.conf.urls.static import static
from django.contrib import admin
from django.urls import include, path

urlpatterns = [
    path("admin/", admin.site.urls),
    path("accounts/", include("accounts.urls")),
]

if settings.DEBUG:
    urlpatterns += static(settings.MEDIA_URL, document_root=settings.MEDIA_ROOT)
3. Implementing the Refresh Token API Link to heading
In this step, we need to create an API that allows users to get a new token when their Access Token expires, without needing to log in again. We’ll use the default view from the SimpleJWT library, with a few modifications:
- The new tokens will be stored in
HttpOnlycookies. - The
Refresh Tokenwill be read from the cookie and sent to the serializer.
# accounts/views.py
from django.conf import settings
from rest_framework import status
from rest_framework.exceptions import PermissionDenied
from rest_framework.request import Request
from rest_framework.response import Response
from rest_framework_simplejwt.exceptions import InvalidToken, TokenError
from rest_framework_simplejwt.tokens import Token
from rest_framework_simplejwt.views import TokenRefreshView

from accounts.jwt import set_token_cookies


class RefreshTokenAPIView(TokenRefreshView):
    def post(self, request: Request, *args, **kwargs) -> Response:
        try:
            serializer = self.get_serializer(data={"refresh": self.get_refresh_token_from_cookie()})
            serializer.is_valid(raise_exception=True)
        except TokenError as e:
            raise InvalidToken(e.args[0]) from e

        response = Response({}, status=status.HTTP_200_OK)

        # Set auth cookies
        access_token = serializer.validated_data.get("access")
        refresh_token = serializer.validated_data.get("refresh")
        set_token_cookies(response, access_token, refresh_token)

        return response

    def get_refresh_token_from_cookie(self) -> Token:
        refresh = self.request.COOKIES.get(settings.SIMPLE_JWT["AUTH_COOKIE_REFRESH"])
        if not refresh:
            raise PermissionDenied

        return refresh
# accounts/urls.py
from django.urls import path

from accounts import views

app_name = "accounts"
urlpatterns = [
    # Auth
    path("auth/refresh_token/", views.RefreshTokenAPIView.as_view(), name="refresh-token"),
    path("auth/login/", views.LoginAPIView.as_view(), name="login"),
]
4. Implementing JWT Authentication with Cookies Link to heading
So far, we’ve managed to log in the user and store the necessary tokens in the user’s cookies. Now, to authenticate the user based on the cookie, we need to write a new Authentication Class that will read the Access Token from the cookie and authenticate the user accordingly.
# accounts/authentication.py
from django.conf import settings
from rest_framework_simplejwt.authentication import JWTAuthentication

class JWTCookieAuthentication(JWTAuthentication):
    def authenticate(self, request):
        header = self.get_header(request)

        if header is None:
            raw_token = request.COOKIES.get(settings.SIMPLE_JWT["AUTH_COOKIE_ACCESS"]) or None
        else:
            raw_token = self.get_raw_token(header)

        if raw_token is None:
            return None

        validated_token = self.get_validated_token(raw_token)

        return self.get_user(validated_token), validated_token
Finally, we need to register this class with DRF so it will be used for user authentication in APIs. We do this by updating the REST_FRAMEWORK settings in the settings.py file:
# backend/settings.py

# DRF
REST_FRAMEWORK = {
    "DEFAULT_AUTHENTICATION_CLASSES": ("accounts.authentication.JWTCookieAuthentication",),
}
To test the authentication system, we can create a simple API that only returns user details if the user is logged in:
# accounts/serializers.py
from django.contrib.auth.models import User
from rest_framework import serializers


class UserSerializer(serializers.ModelSerializer):
    class Meta:
        model = User
        fields = (
            "id",
            "username",
            "first_name",
            "last_name",
        )
# accounts/views.py
from rest_framework import status
from rest_framework.generics import GenericAPIView
from rest_framework.permissions import IsAuthenticated
from rest_framework.response import Response

from accounts.serializers import UserSerializer


class UserRetrieveAPIView(GenericAPIView):
    serializer_class = UserSerializer
    permission_classes = (IsAuthenticated,)

    def get_queryset(self):
        return self.request.user

    def get(self, request):
        serializer = self.get_serializer(instance=self.get_queryset())
        return Response(serializer.data, status=status.HTTP_200_OK)
# accounts/urls.py
from django.urls import path

from accounts import views

app_name = "accounts"
urlpatterns = [
    # Auth
    path("auth/refresh_token/", views.RefreshTokenAPIView.as_view(), name="refresh-token"),
    path("auth/login/", views.LoginAPIView.as_view(), name="login"),
    # User
    path("user/", views.UserRetrieveAPIView.as_view(), name="user"),
]
What’s Next in Part 2? Link to heading
In the first part of the article, we learned about the key concepts of JWT and the challenges that can arise when using it. We also implemented a secure authentication system using JWT and HttpOnly cookies. But this isn’t the end! In Part 2 of the article, we will cover other topics, such as implementing a Logout API and strategies to prevent CSRF attacks.
Read the second part of the article here.
You can also find the complete project code on GitHub. If you found this project helpful, I’d appreciate it if you could give it a star.
https://github.com/mobinghoveoud/drf-jwt-httponly-cookie
If you have any comments, questions, or suggestions, feel free to share them with me on LinkedIn! 🙌
LinkedIn: linkedin.com/in/mobin-ghoveoud